After spending time exploring aspects of the Ancestor Portrait and the importance of ancestor portraits in the Chinese tradition, students will create an ancestor portrait using mixed media materials and present it to the class.
Students will be able to:
- explore cultural traditions about ancestors in China;
- identify the location of China in relationship to where they live, using geographic tools;
- listen and share about what they observe; and
- create an ancestor portrait collage.
Lesson
- Start with students in pairs. To warm up their observation skills, have them think of three words to describe their partner based on what they can see. Call on 3-5 students to share the words. You may want to role play first as an example.
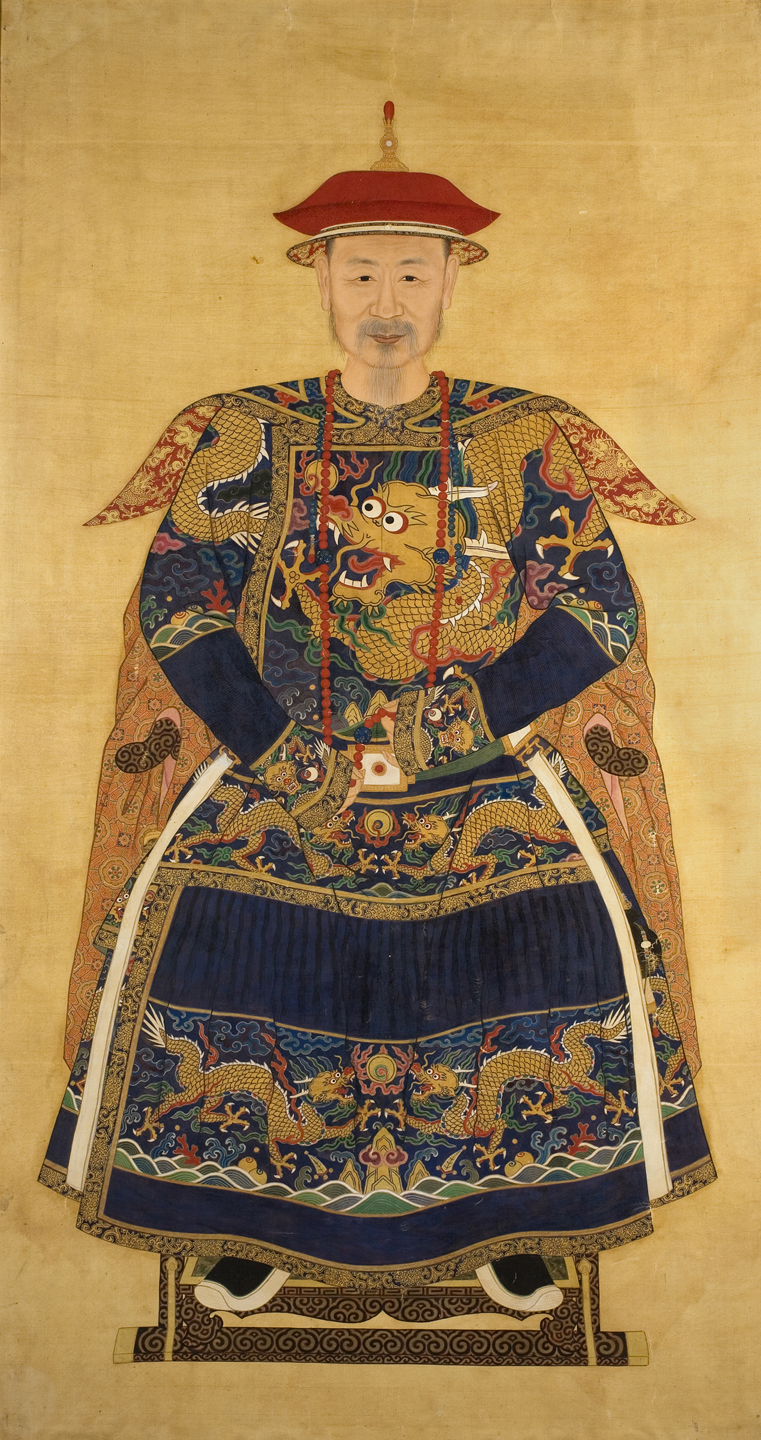
- Next display or hand out the image of the Ancestor Portrait. Explain that you want them to do the same exercise with the Ancestor Portrait. Call on students to share 3 or more words that describe the portrait.
- Explain that the portrait is from China and was created long ago. Show where China is located using geographic tools, in relationship to where the children live.
- Talk about the importance of ancestors in the Chinese tradition. Provide a simple definition of an ancestor. Provide simple details about ancestor worship and celebration. Refer to information in the About the Art section. Example: If properly cared for, ancestors contributed to wealth and good fortune for their descendants. If ignored, ancestors could turn into nasty ghosts who would bring bad luck.
- Spend time examining various elements of the clothing in the portrait. Refer to the “Details” tab of the About the Art section for detailed information. Bring special attention to the various symbols on the robe, like the dragon and the significance of the dragon in China.
- Ask students to think of what they would wear in their own ancestor portrait. Ask them to think about what type of animal they would like on their robe, the color of the robe, or other details.
- Explain that they will create an ancestor portrait by drawing themselves and then applying collage items.
- Provide paper and colored pencils or crayons. Guide them through a simple drawing of themselves.
- Next pass out the animal images from magazines for children to choose from. Encourage them to find images that would describe what they like or tell something about them. You may want to give an example of what you would choose.
- Once they are finished have students share their portraits with the class.
Materials
- Whiteboard or other projection tool for listing words
- Pre-cut animal images from magazines such as Ranger Rick or My Big Back Yard
- Small pieces of fabric, paper and other tactile materials for collage (provide materials that are easy to manipulate and are pre-cut, so children do not need to cut pieces themselves)
- Paper and colored pencils or crayons
- Glue
- Geographic tools: a world map, globe, or access to a computer generated map, like Google Maps.
- About the Art section on the Ancestor Portrait (included with the lesson plan) or student access to this part of Creativity Resource online
- One color copy of the Ancestor Portrait for every 3 students or the ability to project the image for the whole class to see
Standards
- Social Studies
- Geography
- Develop spatial understanding, perspectives and connections to the world
- Visual Arts
- Invent and Discover to Create
- Observe and Learn to Comprehend
- Relate and Connect to Transfer
- Envision and Critique to Reflect
- Language Arts
- Oral Expression and Listening
- Information Literacy
- Invention
- Self-Direction
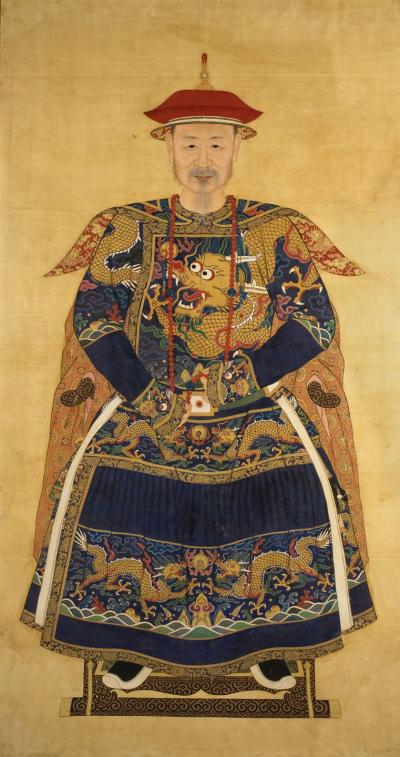
Ancestor Portrait
Artist not known, China 1700-1750, Qing dynasty H: 76 in, W: 41 in Gift in memory of William W. and Mary C. Sinclaire from William Sinclaire, Mary Carroll Sinclaire Morris and Helen Sinclaire Blythe, 2009.751 Photograph © Denver Art Museum 2011. All Rights Reserved.
Family members commissioned most ancestor portraits. They were painted in workshops as the result of collaboration among several artists, few of whom ever signed their names. Workshop organization was highly specialized, and tasks were divided according to skill. The newest, least-skilled artisans might paint only the ancestor’s hat or shoes, while master artists painted faces. Faces were the most important part of the portrait, because they needed to be realistic and individualized; in contrast, the body and its clothing were used to describe social status and did not need to be personalized.
To simplify production, some artists used stencils to draw the bodies and the chairs. Other artists used grids to create the proper proportions for bodies. They could draw a grid in charcoal, which would be erased when painting.
Painting faces required the most skill—in painting just the eyes and eyebrow hairs, artists might use brushes of six different sizes. Painting accurate faces was important, which created a problem if the subject of the portrait was already dead. The artist might bring a sketchbook of faces for clients to look over. The family would then select features based on the sketches—for example, “ears like those on sketch 2 and a nose like that on sketch 5.” Other times, artists would study the features of living relatives and draw the ancestor portrait based on common features. If necessary, the artist would view the corpse—but only if the deceased was male, since ideas about virtue declared that women should not be seen by outsiders.
Family members commissioned ancestor portraits to commemorate deceased relatives. These paintings were treated with the greatest respect. On certain holidays, families would honor their ancestors by bowing before the portraits and placing food in front of them. If properly cared for, ancestors contributed to wealth and good fortune for their descendants. If ignored, ancestors could turn into nasty ghosts who would bring bad luck.
Ancestor portraits have a long history in China and stems from filial piety. This one dates from the early part of the Qing [CHING] dynasty (1644–1911), the last imperial dynasty. Ancestor portraits were usually painted in pairs, so a matching portrait of this man’s wife may exist somewhere.
Ancestors were usually shown in their best dress, which gives us a way to judge the rank of a subject even if we don’t know his or her identity. The most formal costume in the Qing wardrobe was called chaofu, “court dress.” Chao fu [chow FOO]did not refer to a single garment but to an entire outfit, the way a “tuxedo” consists of a shirt, pants, jacket, tie, and cummerbund. Chao fu required a court hat, robe, necklace, and belt, all with prescribed decorations and symbols.
Based on the style of his formal robe, this man was probably an official of the highest rank. However, sometimes people exaggerated an ancestor’s status. Also, if a man attained a higher status than his ancestors had, he could posthumously apply that ranking to his father and grandfather. He might even commission new portraits to show these ancestors with a higher rank.
Details
Court Hat
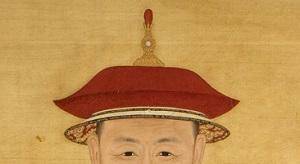
Hats were an integral part of Chinese dress and were worn on all occasions. Made of a bamboo shell and covered with white silk, this type of court hat was worn during the summer. The top of the hat is covered with a red silk tassel made of unspun silk floss.
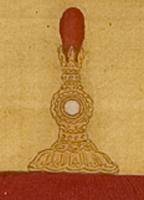
Hat Finial
The finial, or ornament at the top, marks this as a court hat and indicates the wearer’s high rank. Officials of the first rank were entitled to wear a ruby or other red stone finial, with a pearl set beneath it, as this ancestor appears to wear.
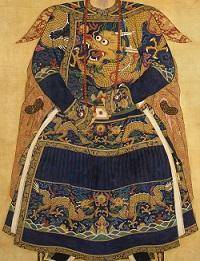
Court Robe
This style of robe is the most formal garment worn in the Qing dynasty. This is a summer robe, probably made of lightweight satin or silk gauze; winter robes had fur linings visible at the cuffs and collar.
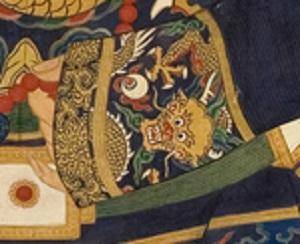
Sleeves
During Qing dynasty times, the ruling Manchu, who came from the northeast to conquer the previous Ming dynasty rulers, changed the style of robes to reflect their own customs and assert their authority. The Manchu valued horseback riding, hunting and military skills. They made the sleeves narrower and added a cuff shaped like a horse’s hoof. This may have been done to make it easier for using the arms in hunting.
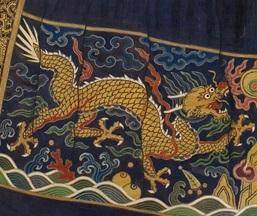
Dragon
The design of the dragon curling over the shoulder identifies this court robe as dating from the early Qing dynasty, probably from the late 1600s or early 1700s. On later robes, the dragon is shown full-on rather than in profile. Dragons were believed to bring rain—important because China was an agricultural society. They therefore symbolized both fertility and masculine vitality. Note that this dragon has four claws on each foot. Princes, noblemen, and high-ranking officials were allowed to wear robes with four-clawed dragons, but only the emperor, his sons, and certain very high-ranking princes and officials were permitted to wear dragons with five claws
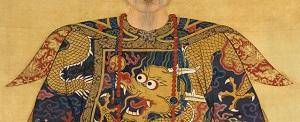
Collar
The collar, an important component of the court robe, may have originated from a hood the Manchu wore when riding. The style of the collar makes a man’s shoulders look broader and more powerful.
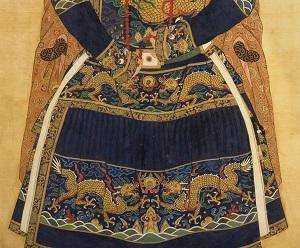
Court Belt
Belts were especially useful because garments had no pockets. External pockets and handkerchiefs could be attached to the belt. The two long narrow white objects hanging from the belt are ceremonial handkerchiefs. Like every other part of the garment, belts were status symbols. The color and ornamentation on the belt was strictly regulated according to rank.
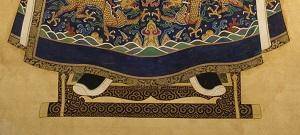
Boots
Boots like these symbolized that a man never walked anywhere because he had a horse to ride. The boots had stiff white soles that originally allowed a Manchu rider to stand up in the stirrups. Such boots were usually made of black satin with soles of leather and felted paper, and cost the same as a servant’s wages for a whole year!
Funding for object education resources provided by a grant from the Morgridge Family Foundation. Additional funding provided by the William Randolph Hearst Endowment for Education Programs, and Xcel Energy Foundation. We thank our colleagues at the University of Denver Morgridge College of Education.
The images on this page are intended for classroom use only and may not be reproduced for other reasons without the permission of the Denver Art Museum. This object may not currently be on display at the museum.
